A passkey replaces the traditional method of entering passwords and confirmation codes. You can log in easily and securely using your fingerprint (Touch ID) or face scan (Face ID) directly on your device.
What types of passkeys are there?
Device-bound: The key is permanently anchored in an app (e.g. Microsoft Authenticator) or on a hardware stick. It cannot leave the device.
Synchronised (especially for Apple users): These keys are encrypted and stored in a cloud (e.g. iCloud). The advantage is that they are automatically available on all linked devices and can be easily restored if the device is lost.
Device-bound passkeys
This variant offers isolated security for a specific device. The passkey is managed directly in the app on your smartphone.
Prerequisite:
Browser: Chrome, Microsoft Edge, Safari (not Firefox!)
Bluetooth must be enabled on your smartphone or tablet
Operating systems Android 14 or iOS 17 and higher
Set MS Authenticator app as password manager
Set up passkeys with MS Authenticator
-
Sign in to your Microsoft account
On your computer, open the Security Information section of your Microsoft account at https://mysignins.microsoft.com/security-info.
Important! Please use Chrome, Microsoft Edge or Safari as your browser! Firefox does not yet support this functionality.
-
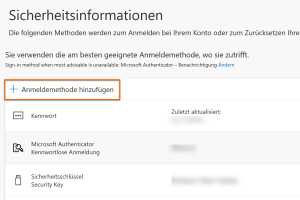
Add login method
In the Security Information section, click on the "Add Login Method" option.
-
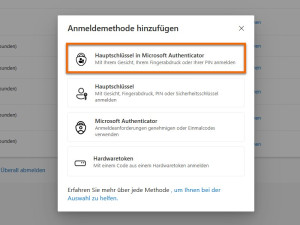
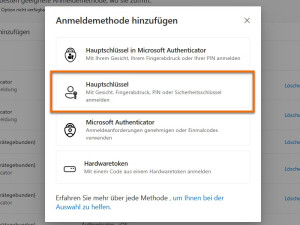
Master key in Microsoft Authenticator
Select "Master key in Microsoft Authenticator" from the list.
-
Install the MS Authenticator app
Do you already have the app on your smartphone or tablet? If so, click “Continue” on your desktop. Otherwise, download “Microsoft Authenticator” now from the App Store (iOS) or Google Play Store (Android).
Important note on setup: Microsoft requires an additional authentication factor for secure access. Since modern passkeys are not yet compatible with all applications (e.g., the Studo app), the Authenticator app serves as your necessary safety net.

-
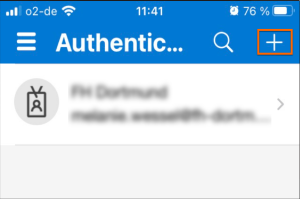
Open the Microsoft Authenticator app
Now open the Authenticator app on your smartphone or tablet.
If you are using the app for the first time: Tap the plus sign (+) in the top right corner and select ‘Business or school account’.
Follow the instructions to add your account (e.g. vorname.nachname@fh-dortmund.de) using a QR code.
-
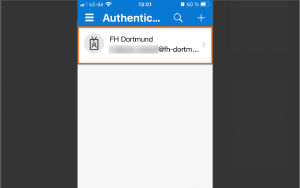
Create passkey
Tap on your already added FH account in the app.
Under "Other ways to sign in", select the option "Create passkey" and follow the installation dialogue.
-
Master key successfully generated
Please return to the browser window and click on "Continue".
You will receive the success message "Master key created". After that, the registration is successfully completed with "Done".
Signing in with a Microsoft Passkey in the Chrome browser (desktop computer)
-
Open web browser
Open your web browser (Chrome, Safari, Microsoft Edge).
Log in to the intranet, for example: https://intranet.fh-dortmund.de/auth/azure/login
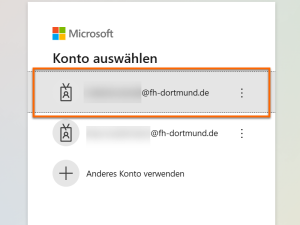
As soon as the login screen appears, select your FH account.
-
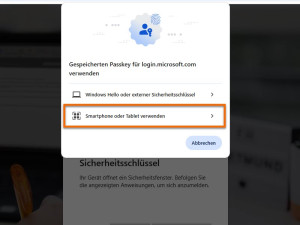
Select Passkey as your sign-in option
To use passkeys for login, click on "Use smartphone or tablet".
-
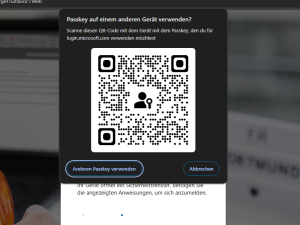
Scan QR Code
Scan the QR code with your smartphone or tablet on which you have set up your passkey via the app.
The message "Passkey QR code: sign in with a passkey" will appear on your smartphone/tablet. Tap on it.
-
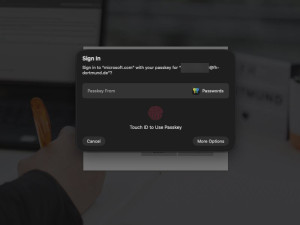
Log in with a passkey
A message will appear on your smartphone/tablet stating that you are logged in with your FH account at "login.microsoft.com".
Click "Continue" and confirm the action with Touch ID.
Done.
Synchronised passkeys
Unlike the device-bound version, synchronised passkeys are stored in a digital safe (cloud). This offers two major advantages: the keys are immediately available on all your devices, and if you lose a device, they can be easily restored.
Available storage options:
Depending on the system used, there are different providers for this synchronisation:
iCloud Keychain: Standard solution for Apple users (synchronisation between iPhone, iPad and Mac).
Google Password Manager: The solution for Android users and the Chrome browser.
KeePassXC/DX: Platform-independent; requires a suitable browser extension on your PC.
Note: Other third-party providers (password managers) can be set up on request by contacting support@fh-dortmund.de.
Passkeys for Apple users (Mac & iCloud)
The following describes the setup within the Apple ecosystem, as it is particularly seamlessly integrated into the operating system.
Requirements:
Hardware: Mac (with Touch ID) and an iPhone (with Face or Touch ID)
Operating system: At least macOS 13+ (Ventura) and iOS 16+
Synchronisation: iCloud > Passwords must be active and iCloud must be connected to both devices
System settings > [Your name] > iCloud > Passwords
Configuring the passkey on a Mac
-
Open security options
Open Safari/Chrome on your Mac and sign in at account.microsoft.com/security.
-
Add login method
Click on "Add login method".
-
Select security key
Select the option "Passkey/Master key" from the list and follow the dialogue by clicking "Next" (twice).
-
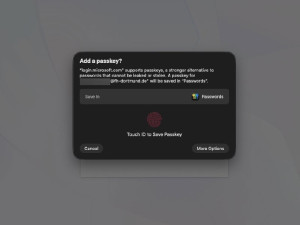
Add passkey
Confirm the macOS system dialogue for creating a passkey for "microsoft.com" using Touch ID or Face ID.
-
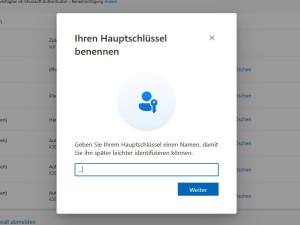
Name passkey
After creation, Microsoft will ask you to give the passkey a name (e.g. "My MacBook Pro"). This name is used to uniquely identify the key.
-
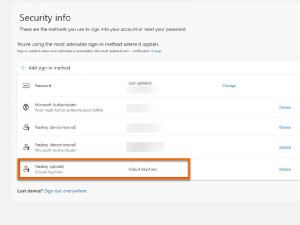
Done!
The new passkey will now be permanently listed in your login methods on the Microsoft security page, where it can be managed or removed as needed.
Signing in with the passkey on Mac
-
Open web browser
Open your web browser (Chrome, Safari).
Log in to the intranet, for example: https://intranet.fh-dortmund.de/auth/azure/login
-
Enter/select email address
After setting up, simply enter your email address on the Microsoft login page when logging in.
-
Authentication via Face or Touch ID
The system automatically prompts you to confirm via Face or Touch ID. You are logged in immediately – password-free and secure.
Frequently asked questions
What happens if I lose my iPhone or Mac?
With synchronised passkeys (Apple)
Don't worry. Your passkeys are secured in iCloud Keychain. As soon as you sign in to a new Apple device with your Apple ID, your access will be automatically restored.
Security recommendation: Although access to the lost device is protected by biometrics, if it is definitely lost, you should consider renewing your most important passkeys (e.g. for banking or main email accounts) for security reasons and locking or erasing the lost device using Apple's "Find My" feature.
For device-bound passkeys (Microsoft Authenticator)
The protection is stricter here. You will need to reinstall the app on the new device and set up a new passkey for your FH account – either using an alternative MFA method or through IT support (support@fh-dortmud.de, +49 (0231) 9112-8888). If you send an email, please include the subject line "MFA reset, first and last name [ID]" so that we can process your request immediately.